Editing Adjustments
When you create an adjustment, it is saved to your CPMobile device, allowing you to modify it before exporting it to your Counterpoint database. You can update the quantity for an adjustment from the Adjustments screen or from the Adjustment Detail screen. You can also use the Adjustment Detail screen to change the transaction date for an adjustment, choose the adjustment unit, select a reason code for the adjustment, specify the account for the adjustment distributions, and enter reference text or a document number for the adjustment.
To edit an adjustment, tap Edit Adjustments on the Adjustments menu to display the  Adjustments screen, which displays all of the pending adjustments on your CPMobile device, and then make the necessary changes.
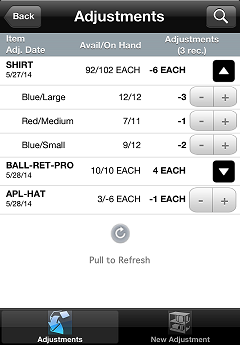
Use the  buttons to modify the adjustment quantity for an item:
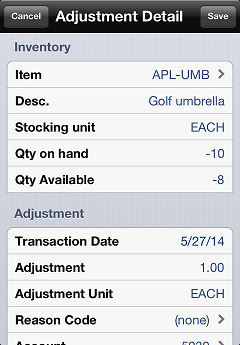
 You can also tap the adjustment line, tap the Adjustments field on the Adjustment Detail screen, and then modify the adjustment quantity directly.
To modify the adjustment quantity for a gridded item, tap the  button to expand the adjustment:
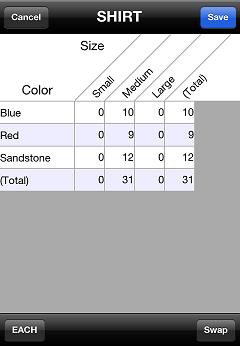
You can also tap the main adjustment line for a gridded item, tap the Adjustments field on the Adjustment Detail screen to display the grid table, and then modify the adjustment quantity for each cell.
To modify the adjustment quantity for a serialized item, tap the adjustment line, tap the Adjustments field on the Adjustment Detail screen to display the Serial Adjustment screen, and then add or remove serial numbers from the adjustment.
You can also delete serial numbers from an adjustment on the Adjustments screen tapping the button to expand the adjustment, swiping the serial number you want to delete, and tapping the  button.
To delete an adjustment, swipe the adjustment on the Adjustments screen and tap the button.
You can delete individual cell lines from an adjustment for a gridded item by tapping the button to expand the adjustment, swiping the cell you want to delete, and then tapping the button.
By default, the transaction date for each adjustment is automatically set to the date on which you create the adjustment.
To change the transaction date for an adjustment, tap the adjustment line on the Adjustments screen, tap the Transaction Date field, and use the date picker to select the new transaction date.
Tap Save on the Adjustment Detail screen to save your changes.
By default, the unit for each adjustment is automatically set to the selling unit for the item.
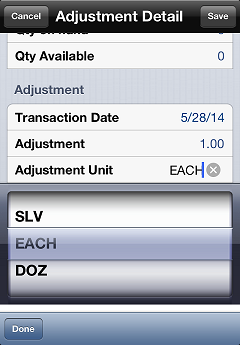
To change the unit for an adjustment, tap the adjustment line on the Adjustments screen, tap the Adjustment Unit field, use the unit picker to select the unit you are adjusting, and then tap Done.
Tap Save on the Adjustment Detail screen to save your changes.
Depending on your Counterpoint configuration, you may be required to select a reason code for each adjustment.
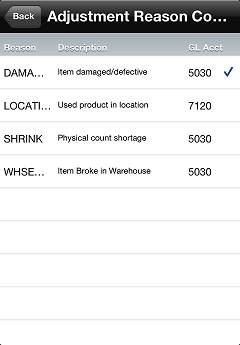
To assign a reason code to an adjustment, tap the adjustment line on the Adjustments screen, tap the Reason Code field to display the Adjustment Reason Codes screen, and the tap the reason code that best explains the adjustment.
When you select a reason code for an adjustment, the G/L account number assigned to the reason code is also assigned to the adjustment.
Tap Save on the Adjustment Detail screen to save your changes.
By default, the G/L account number to which distributions will be posted for each adjustment is automatically set to the Adjustments account number specified on the Other COGS tab of the Account Codes window (Setup > Inventory > Account Codes) in Counterpoint. If you assign a reason code to an adjustment, the G/L account number assigned to the reason code is also assigned to the adjustment.
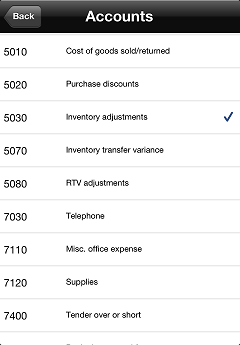
To assign a different G/L account number to an adjustment, tap the adjustment line on the Adjustments screen, tap the Account field to display the Accounts screen, and then tap the account you want to assign to the adjustment.
Tap Save on the Adjustment Detail screen to save your changes.
You can enter a remark or comment, as well as a document number, for an adjustment by tapping the adjustment line on the Adjustments screen and editing the Reference and Document # fields. These values are strictly for your reference.