Counting Gridded Items
When you add a gridded item to the Physical Count worksheet, the grid table appears automatically, allowing you to specify the count quantity for each grid cell.
![]() If you scan a cell-specific barcode to add an item to the Physical Count worksheet, the corresponding grid dimensions are selected automatically and the grid table does not appear.
If you scan a cell-specific barcode to add an item to the Physical Count worksheet, the corresponding grid dimensions are selected automatically and the grid table does not appear.
For each gridded item that has been counted, the ![]() Physical Count worksheet includes a row for the item itself, followed by a row for each cell (i.e., color/size/width combination).
Physical Count worksheet includes a row for the item itself, followed by a row for each cell (i.e., color/size/width combination).
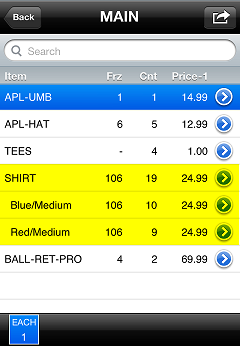
To view count quantities for all of a gridded item's cells, tap the ![]() button for the item, and then tap View grid to display the
button for the item, and then tap View grid to display the ![]() grid table.
grid table.
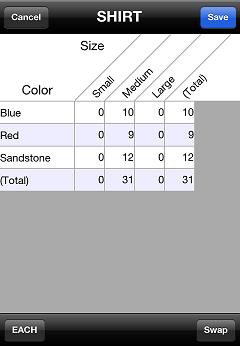
![]() By default, the grid table displays the first two dimensions in the grid (e.g., color/size). If the grid has three dimensions (e.g., width), tap the corresponding button to display the grid picker, which allows you to select the dimension you want to summarize and filter it to a specific value. Tap the Swap button to change the positions of the dimensions in the grid table.
By default, the grid table displays the first two dimensions in the grid (e.g., color/size). If the grid has three dimensions (e.g., width), tap the corresponding button to display the grid picker, which allows you to select the dimension you want to summarize and filter it to a specific value. Tap the Swap button to change the positions of the dimensions in the grid table.
Tap a cell in the grid table to ![]() enter the count quantity for that cell.
enter the count quantity for that cell.

![]() If the Scan = Qty 1 setting on the main Physical Count screen is ON, when you scan a gridded item, the item is added to the Physical Count worksheet with a count quantity of 1. If the item is already on the worksheet, the item's count quantity is increased by 1.
If the Scan = Qty 1 setting on the main Physical Count screen is ON, when you scan a gridded item, the item is added to the Physical Count worksheet with a count quantity of 1. If the item is already on the worksheet, the item's count quantity is increased by 1.
Tap Save to save your changes and update the Physical Count worksheet with the count quantities you entered for each cell.