Adjusting Serialized Items
When you create an adjustment for a serialized item, the ![]() Serial Adjustment screen appears, allowing you to select the serial numbers you are removing from inventory or specify the serial numbers you are adding to inventory.
Serial Adjustment screen appears, allowing you to select the serial numbers you are removing from inventory or specify the serial numbers you are adding to inventory.
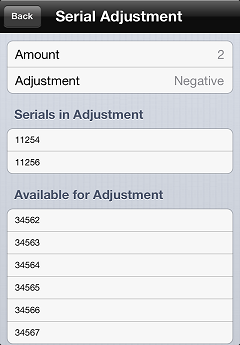
To create a negative adjustment for a serialized item, tap the serial number(s) you want to remove from your inventory in the Available for Adjustment list. Each time you tap a serial number, it is moved to the Serials in Adjustment list and the Amount value is increased by 1.
![]() To remove a serial number from the Serials in Adjustment list and return it to the Available for Adjustment list, swipe the serial number and tap the
To remove a serial number from the Serials in Adjustment list and return it to the Available for Adjustment list, swipe the serial number and tap the ![]() button.
button.
To create a positive adjustment, tap the Adjustment field to on the ![]() Serial Adjustment screen to change the adjustment type to Positive, and then tap the serial number(s) you want to add to your inventory in the Available for Adjustment list.
Serial Adjustment screen to change the adjustment type to Positive, and then tap the serial number(s) you want to add to your inventory in the Available for Adjustment list.
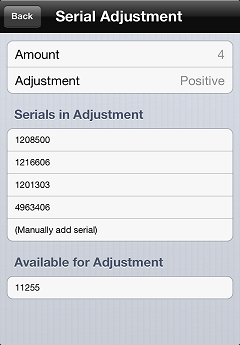
If a serial number you want to add does not appear in the Available for Adjustment list, tap the (Manually add serial) and enter the serial number manually, or scan a serial number barcode.
Each time you add a serial number to the Serials in Adjustment list, the Amount value is increased by 1.
![]() To remove a serial number from the Serials in Adjustment list, swipe the serial number and tap the
To remove a serial number from the Serials in Adjustment list, swipe the serial number and tap the ![]() button.
button.
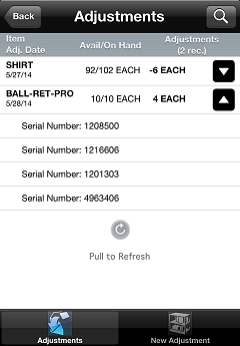
When you are finished adding or removing serial numbers, tap Back to return to the Adjustment Detail screen, and then tap Save to save the adjustment. On the ![]() Adjustments screen, tap the
Adjustments screen, tap the  button to expand the adjustment and display the serial numbers you are adjusting.